Get Started
FAQ
Connecting directly to a device using an Ethernet cable
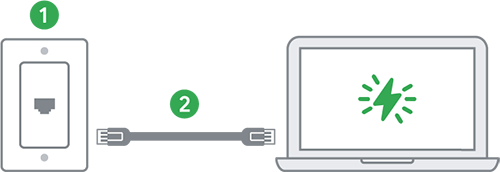
1. Find the data jack installed on your wall (Hint: it looks like a big phone jack, usually found in the living room or bedroom.)
2. Plug the other end of the Ethernet adapter into the data jack and the other end into the Ethernet port on your device. Boom. Instant access to internet – no other equipment needed.
Can’t find an Ethernet port on your device? You might need an Ethernet adapter. See “Connecting to a device with no Ethernet port” for more info.
COAX CONNECTION

1. Confirm your modem is connected to the coax outlet on your wall.
2. Plug one end of an Ethernet cable into your modem and the other end into your device’s Ethernet port for instant access to the internet.
Can’t find an Ethernet port on your device? You might need an Ethernet adapter. See “Connecting to a device with no Ethernet port” for more info.
Connecting to WiFi

1. Find the data jack installed on your wall (Hint: it looks like a big phone jack, usually found in the living room or bedroom.)
2. Plug the other end of the Ethernet adapter into the data jack and the other end into the router port labeled “WAN” or “INTERNET.”
3. Refer to your router’s user manual for how to connect wirelessly to your device.
Connecting to a device with no Ethernet port
Can’t figure out how to plug in? You’re not missing something; your device is—an Ethernet port! But don’t worry, you can still plug in your device to get the fastest, most reliable connection by using an Ethernet adapter. An Ethernet adapter plugs into whatever port you have on your device and turns it into an Ethernet port.


1. Plug one end of an Ethernet cable into the data jack and the other end into the Ethernet port on the Ethernet adapter.
2. Plug the other end of the Ethernet adapter into the corresponding port on your device.
There are several types of Ethernet adapters that are made to fit different ports on different devices. Here are the most common types of ports, so you can check if any match the one(s) on your device.
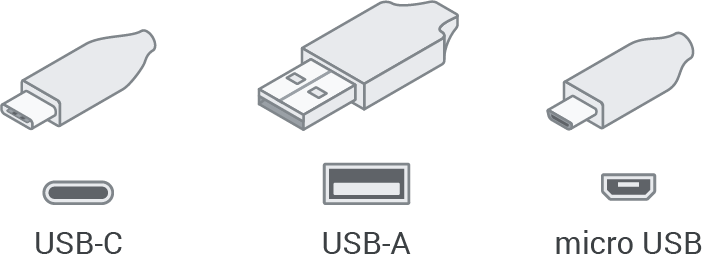
You can also connect to WiFi using a WiFi router, and you won’t have to worry about any wires, plugs, or ports on your device. But you’ll also need your own wireless router. See our tips on how to pick a WiFi router.
Google WiFi Set Up
ETHERNET CONNECTION
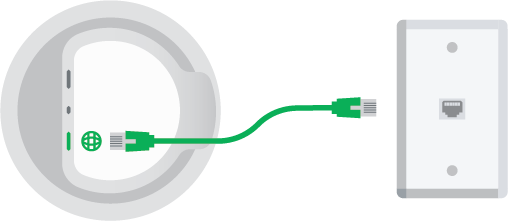
1. Connect one end of an Ethernet cable to your Google Wifi’s WAN port (🌐) and the other end into the wall jack. Please note: you do NOT need a modem with Google Fiber Webpass service.
2. Plug the router into a wall outlet.
3. Wait 90 seconds for the light to slowly pulse blue. This indicates that it is ready to be set up in the Google Home app.
4. Download and use the Google Home app on your iOS or Android device to set up and manage your Wi-Fi network.
COAX CONNECTION

1. Confirm your modem is connected to the coax outlet on your wall.
2. Connect one end of an Ethernet cable to your Google Wifi’s WAN port (🌐) and the other end into the modem.
3. Plug the router into a wall outlet.
4. Wait 90 seconds for the light to slowly pulse blue. This indicates that it is ready to be set up in the Google Home app.
5. Download and use the Google Home app on your iOS or Android device to set up and manage your Wi-Fi network.
Tips for picking a WiFi router
There are many options for WiFi Ethernet routers. The one that’s right for you will depend on a few factors like the number of connected devices, the layout of your home, and your online activities. Here’s some guidance to help pick out one that best fits your needs. A cable or DSL modem-router combo will NOT work with Webpass service.
The basic option – for the typical internet user
To optimize our super fast speeds, look for a router with these basic features:
• 802.11ac
• Dual-band
• Gigabit Ethernet ports
Our recommendation: The NETGEAR Nighthawk AC1900 Smart Wifi Router will support typical online activities, like email, web browsing, and streaming, but doesn’t have all the bells and whistles of some of the more top-tier models.
The heavy hitter – for gamers and heavy internet users
If you’re a gamer or have a ton of devices, the extra cost for a more powerful router might be worth never having to suffer the buffer:
• WiFi 6
• Dual-band
• Gigabit Ethernet ports
Our recommendation: The NETGEAR Nighthawk AX12 provides more bandwidth for those who have the need for speed.
A mesh-router system – for homes with larger coverage area or WiFi dead spots
A mesh-router system uses multiple devices throughout your home to get signal to those dead spots a single WiFi router can’t reach. This option is the best way to eliminate spotty connectivity in units that are larger than 2200 square feet, have concrete or brick interior walls, or are split or multiple levels (guidelines here).
Our recommendation: Google Nest Wifi is a scalable system that gives both whole-home coverage and a consistently strong signal. Each Nest Wifi point is also a smart speaker with the Google Assistant, and you can manage the whole system with the Google Home app.
Keep in mind, when using WiFi, your internet speeds will only be as fast as your router’s connection. Plugging your device directly into an Ethernet port on your router will always give you the fastest, most reliable speeds. We suggest using a wired connection for streaming devices, game consoles, and other gadgets that use lots of internet bandwidth.
FAQ
How do I create an account?
To sign up, check whether Google Fiber Webpass plans are available near you here. If you’re eligible, you will be prompted through a step-by-step process to sign up for service.
Make changes to your account or service
Click the Account Settings link on the left side of your customer portal dashboard to:
• update your account contact details and/or login password
• move, transfer, or disconnect your service
FAQ
View your account & billing info
Click the Billing link on the left side of your customer portal dashboard to view your account balance, billing history, and detailed statements.
Getting your bill
Right after your installation, we’ll email your first bill to the email address you used to sign up for Google Fiber Webpass service.
Month-to-month service billing: You’ll get a bill every month, same place, same time (i.e., in your email on the same day of the month as your installation date).
Yearly service billing: You’ll get a bill in your inbox every year on the same day your service was installed.
To see your billing info and history, visit the Billing page in your customer portal.
Google Fiber Webpass is proud to be paper free!
We only send bills to your inbox, not your mailbox. And while no trees are harmed in the sending of your bills, sometimes emails get lost. Make sure you have the right email address on your Google Fiber Webpass account and check it regularly—including your spam folder.
For more info on billing and payments visit our FAQ
Paying your bill
Pay your bill online
The fastest and easiest way to pay is by credit card or ACH through your customer portal. Log into your Google Fiber Webpass account, and click the Billing link in the menu on the left side of your dashboard page. On the Billing page, you’ll see the option to make a one-time payment or set up autopay. If you really want to make things easy for yourself, set up autopay to pay your bill automatically every month on your billing date, and you’ll never have to worry about remembering to pay your bill or missing a payment.
Pay your bill over the phone
If you prefer to pay by phone, call our Customer Support phone number to speak to a helpful human who will guide you through the process.
Other useful links:
FAQ
No internet access with a wired connection
1. Make sure the Ethernet cable is plugged firmly into both the data jack & your device.
2. Visit your customer portal at webpass.net and check the network status for an outage.
3. Restart your device.
4. Try to access the internet from another device to see if the problem is with your device or the network.
Slow speeds with a wired connection
1. Restart your device.
2. Close any apps that are running & disconnect all other devices from the network.
3. Make sure your operating system, web applications, and web browser are all up to date.
4. Run a scan for spyware, viruses, and malware.
5. Clear your browser’s cache and/or cookies. Visit your browser’s support site to learn how to do this.
6. Try using a different web browser.
Issues with Wifi connection
Always check your wired connections before troubleshooting WiFi issues. If you’re still having WiFi woes, try these common fixes:
1. Make sure the Ethernet cable is firmly connected to both the data jack and the “WAN” or “INTERNET” port on your router.
2. Unplug your router, wait 30 seconds, then plug it back in. Give it a few minutes to start up and reconnect before checking your connection again.
3. Confirm your router can support our super fast speeds and its firmware is up to date. Refer to your router’s user manual for how to check this info.
4. Place your router in the best spot for the signal to reach your device—usually the center of your home, away from walls, on a higher surface, like a desk or bookshelf.
If all else fails, please contact the router manufacturer directly for support.
(As much as we’d love to help, we can only control the Ethernet connection to your Google Fiber Webpass jack, not the signal between the WiFi router and your device.)
Open a support ticket
Visit your customer portal & click the Support link on the left side of your dashboard page. After you’ve submitted a ticket, you can also track the status of your issue here.
Or contact support directly:
Email support@webpass.net or call us:
San Francisco, San Diego, Seattle, Chicago, Denver or Miami
1-800-WEBPASS (1-800-932-7277)
Austin or Nashville
1-877-559-7277
FAQ
How to self-install Google Fiber Webpass service
If you’ve signed up for Google Fiber Webpass and selected to self install, follow the steps below to connect to our service.
Step 1: Find the data jack on the wall in your unit.
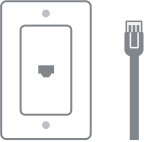
(Hint: It looks like a big phone jack, usually located in the living room or bedroom.)
Step 2: Connect your router to the data jack.

Plug one end of an Ethernet cable into the wall jack and the other end into the router port labeled “WAN” or “INTERNET.”
Step 3: Look for signs of internet life.
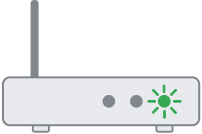
Shortly after plugging it into the data jack, check your router’s indicator light to confirm it’s connected to the internet.
![]() Internet connection status: success!
Internet connection status: success!
If your router shows a successful internet connection, refer to your router’s manual for instructions on how to set it up and connect wirelessly to your devices. Then move on to step 4.
X Failed/no internet connection:
If your router shows no signs of internet life when you plug it into the data jack:
- Make sure your router is powered on and the Ethernet cable is plugged firmly into the router’s WAN (Internet) port and the data wall jack. If all this looks good, you might have the wrong jack.
- Look for more jacks in your unit and repeat this process until your router indicates a successful connection.
- If none of your data jacks seem to connect to the internet, contact us at support@webpass.net or (866) 663-9209.
Step 4: Check your connection & set up your account

After you set up your WiFi, test your connection by opening up a browser and visiting a website. If you aren’t able to get online, go back to Step 3 to troubleshoot.
If you haven’t already set up your account, check your email for a message from us. We sent you an email with a link to activate your account. You’ll need to use this link to create your account. Once your account is set up, you can access your customer portal to do all sorts of things, like pay your bill, set up autopay, check network updates, and contact support. So go find that email and click that link!
When will I get billed if I self-install?
Billing doesn’t start until you complete the self-installation process and successfully connect to our service. Right after you complete your self-installation, we’ll email your first bill to the email address you used to sign up for Google Fiber Webpass service. That means if you install service a few days after you sign up, your billing date will be the day you connected.
Month-to-month service billing: You’ll get a bill every month, same place, same time (i.e., in your email on the same day of the month as your installation date).
Yearly service billing: You’ll get a bill in your inbox every year on the same day your service was installed.
To see your billing info and history, visit the Billing page in your customer portal.
Google Fiber Webpass is proud to be paper free!
We only send bills to your inbox, not your mailbox. And while no trees are harmed in the sending of your bills, sometimes emails get lost. Make sure you have the right email address on your Google Fiber Webpass account and check it regularly—including your spam folder.
For more info on billing and payments visit our FAQ
